Quickstart: Just the Board
This page runs through the steps of configuring a “bare” Novena mainboard for use as a display-less system using the factory-installed microSD card as the rootfs media.

Novena PVT2 “Just-The-Board” contents (December 2014)
Before you begin...
You will need a 3.3V USB-FTDI cable and a computer to work from (as a terminal). You will also need an Ethernet cable if you want wired networking.
First, before applying power, attach the FTDI cable with the USB side connected to your host machine and the UART end connected to the Novena. The correct UART connection is described on the “Using Novena PVT1” wiki page, and is shown below.
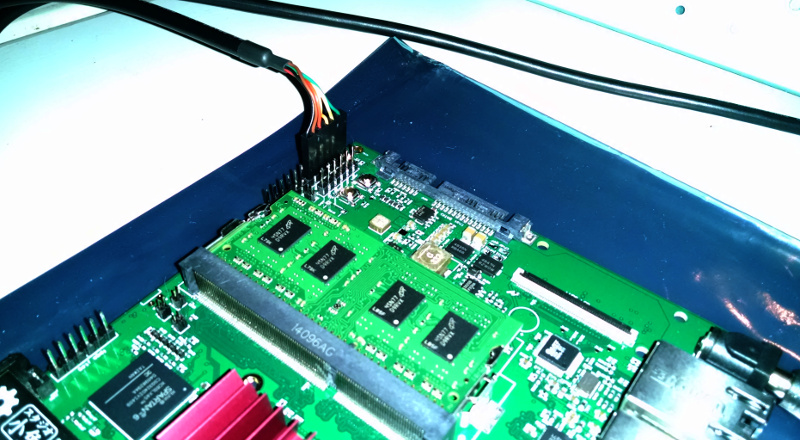
Novena PVT2 board with FTDI UART cable attached to console port (note wire colors and orientation)
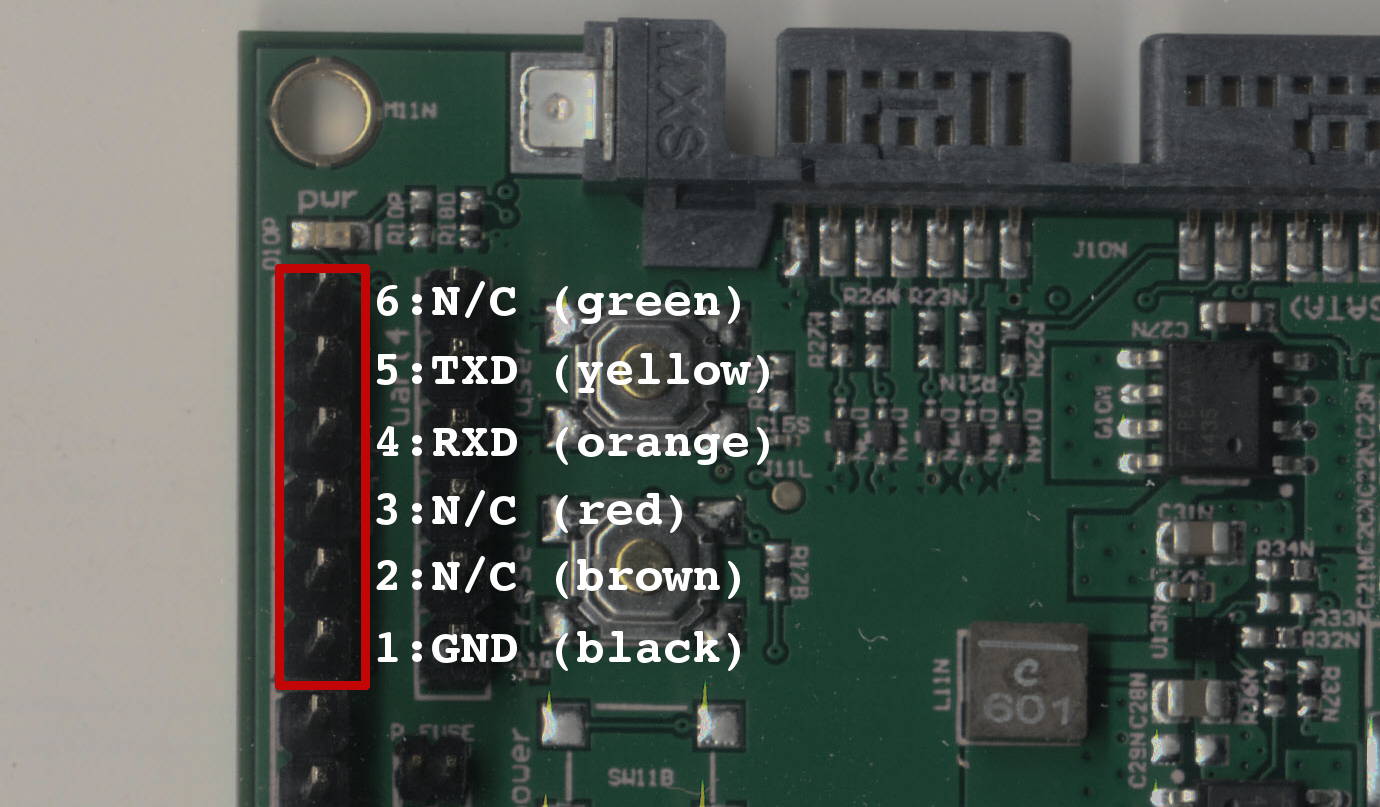
Pinout of Novena PVT2 board console port, wire colors correspond to default FTDI UART connector
Open a terminal program on the work machine and open the FTDI device using
115200 baud as the speed and “normal” settings for everything else (eg,
8n1). For example, on a UNIX machine you could use the screen command
line program:
screen /dev/ttyUSB0 115200
# Should be a blank screen until the Novena boots.
# Type "Ctrl-A" then "k" to quit when you are done.
Or you could use minicom or GtkTerm or whatever your favorite is. If you get
access errors, you might need to add yourself to dialout or plugdev or
a group like that, then completely log out and log back in:
$ ls -l /dev/ttyUSB0
crw-rw---- 1 root dialout 188, 0 May 28 21:10 /dev/ttyUSB0
$ groups
SOMEBODY cdrom floppy audio dip video plugdev netdev
$ sudo usermod SOMEBODY -a -G dialout
$ groups
SOMEBODY cdrom floppy audio dip video plugdev netdev
$ # Still need to logout and back in, then:
$ groups
SOMEBODY dialout cdrom floppy audio dip video plugdev netdev
Finally, connect power to the Novena board’s DC barrel jack. You should see u-boot and then kernel boot messages stream out the console.
Eventually you will enter the “first run” menu system, which was created
by xobs specifically for the Novena. You should be able to make reasonable
selections for yourself by reading the prompts; a US-centric set of defaults
for a headless (aka, no display) system might be:
- “Configuring console-data”: select “Don’t touch keymap”
- “Configuring locales”: “en_US.UTF-8 UTF-8” or yours
- “Configuring locales”: the locale you selected
- “Configuring tzdata”: your region, or “none of the above” to get to UTC
- Enter a new root password
- Create a user account
- Choose a hostname or accept the autogenerated one
- Disable graphical logins
Following all the prompts, the system should get configured and you will be able to login as the user you created. Blessed be!
The next step will be to get networking up and running so you can upgrade and/or install new software.
Note
You need a wired connection to install required utilities before you can configure the wireless interfaces.
Configure Ethernet Networking
Attach ethernet cable to a switch/router to the left-hand port (eth0). If DHCP is enabled on the local network, the interface should be configured automatically. Test the connection with:
sudo ifconfig eth0
sudo ping www.mit.edu
Configure WiFi Networking
Install packages (over the wired connection); be sure to add your user to the netdev group when prompted:
sudo apt-get install wireless-tools iw wicd-curses
Run wicd-curses to connect to a wireless access point. You should be
presented with a list of detected stations; hit enter to connect to a station,
or right arrow and then scroll down to enter a WPA/WPA2 password (if
necessary).
You could also install network-manager instead of wicd and use the
nmtui command to connect to networks and manage wired networking as well.
After networking is configured
Once networking is going, you should definately update the apt package
database, and you may wish to upgrade all existing packages (from the factory
image) to the most recent available versions.
The default configured debian mirror (to download updates from) is in the
United States. You might want to change the /etc/apt/sources.list file to
point to something closer; changing to http.debian.net will auto-select a
good mirror wherever you are in the world.
To update package information, a process which should run reasonably fast even the first time:
sudo apt-get update
The upgrade step could take 30+ minutes all together, even given a fast
connection, because disk I/O operations on the built-in microSD card are very
slow. Don’t start this process until you are patient enough to let it finish
without interruption. You don’t really need to do the upgrade up front
before you start experimenting, it’s just a good idea to stay patched with bug
fixes and security updates. To upgrade all packages with new versions, run:
sudo apt-get upgrade
You may encounter a dpkg problem with the dbus package (“Package
libdbus-1-3:armhf is not configured yet.”). If this happens run sudo apt-get
install -f to fix configuration, then sudo apt-get upgrade to finish the
upgrade.
You will almost certainly find youself needing i2c control utilities if you will be hacking on the Novena, eg to compile the FPGA userland tools, so now would be a good time to do:
sudo apt-get install i2c-tools libi2c-dev
Fixing Audio
The version of pulseaudio-novena that shipped with PVT2 boards (v1.0) has
some known problems that prevent audio from working correctly out of the box.
Later versions (v1.1) fix this, but as of January 10th 2015 have not been
pushed to the Kosagi apt repository as a package update.
As a work around, one can either build a new .deb and install that, or as a
hack just copy the updated configuration files by hand to the correct paths.
After this the audio will need to be unmuted and turned up using alsamixer
as usual. mplayer works fine for playing audio files from the (headless)
command line.